ERPLY Release 2013!
This time, we have focused our efforts on
Inventory and Purchasing
. We have also revamped
matrix product support
; and finally, there is integration with cutting-edge Actual Reports label and template designer
— for all of your future labeling and document design needs. All together, the all-new ERPLY 2013 includes hundreds of new features! Interested? Learn more about ERPLY:
Retail & POS
—
Enterprise Inventory Features
—
Spa & Salon
.
Sign up for a FREE ERPLY account!
Check out ERPLY demo.
Here is a selection of features we are most proud of:
Better Matrix Product Management
— Add variations to a sales invoice with ease utilizing the new Matrix grid. Easily update all variation cards. Set Reorder Points and Restock Levels.
Label & template designer by Actual Reports (BETA)
— Print product or customer labels, design your own document templates. Check out what Actual Reports is about: http://actualreports.com
.
Non-stock Products
— A new, better alternative to Services. Non-stock products can be imported, added to promotions and price lists.
Product Assembly
— Build assembly products from source components. Unlike with bundles, you will now know exactly how many assemblies there are in stock. Assembly cost is automatically calculated.
New Product Statuses & Product Archiving
— Set a product as “No Longer Ordered” or “Not for sale”. Bulk archive discontinued items.
Better Product Export (to Excel)
— Download all your product data (including costs and inventory quantities) as an Excel spreadsheet. You can also edit and re-import to make bulk changes easily.
Drop Shipping
— Print customer’s name and address on a Purchase Order printout.
Delivery Date Tracking (for sales orders and POs)
— Assign customer-requested delivery dates to Sales Orders, and supplier-quoted delivery dates to Purchase Orders. ERPLY helps you to make sure that everything gets shipped on time.
Central Purchasing
— If your HQ aggregates all purchase orders and later distributes supplies to branch offices.
Sales Order Splitting
— To keep better track of partial fulfillments.
try
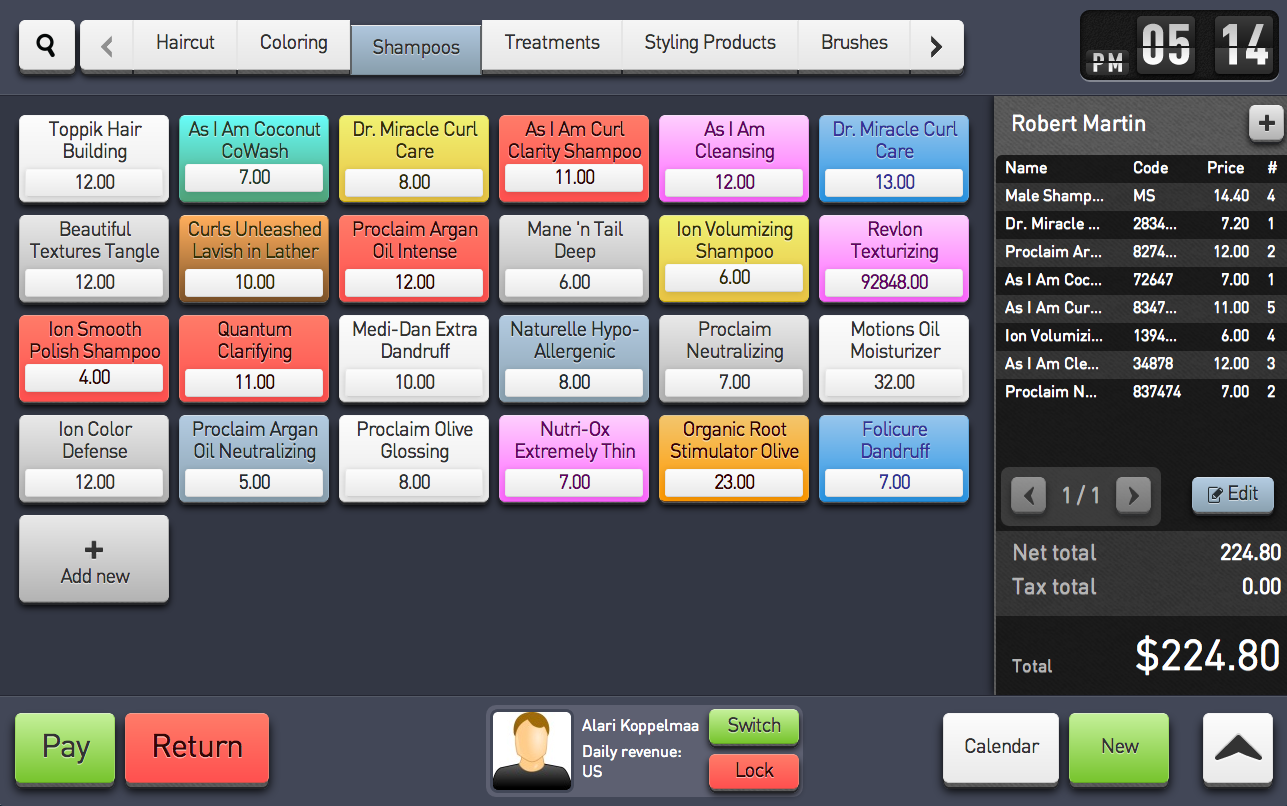
our new user-friendly Point of Sale interface!
Choose from two distinct views, then create and navigate through your products with ease. Speed transactions by organizing color-coded quick tabs, or even add product pictures.
Below you will find detailed descriptions for each new feature.
Main Features
1.
Better management of matrix products
Matrix support has been updated with a number of new features:
Picking variations to a PO or sales invoice.
When you pick a matrix product (to any sales, purchase, or inventory document), Erply presents the following grid:
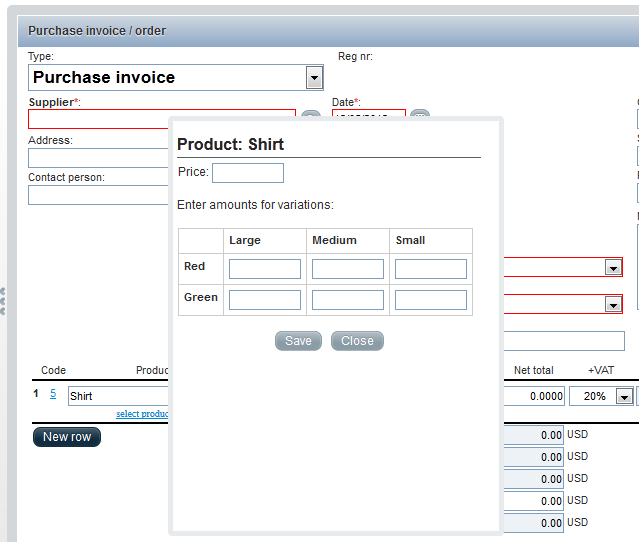
Fill in the quantities for each variation. All selected variations are automatically added as invoice lines — you no longer need to add each variation manually.
NB! We have slightly adjusted the way product search returns search results. If you enter the name or code of a matrix product, Erply first shows you just the matrix product itself — variations are not listed. That way, the list of search results is less cluttered, and by selecting the matrix product and bringing up the grid, you can pick a specific variation anyway.
However if you enter a name, code, or UPC that matches a variation, it is displayed in the search results as usual. Therefore, composing an invoice or PO by scanning product codes will work like always.
If you want to revert back to the old behavior (where both matrix products and variations are always listed), go to “Settings” → “Configuration” → “Inventory and Purchase” and check
“Product search always returns both matrix products and variations”
.
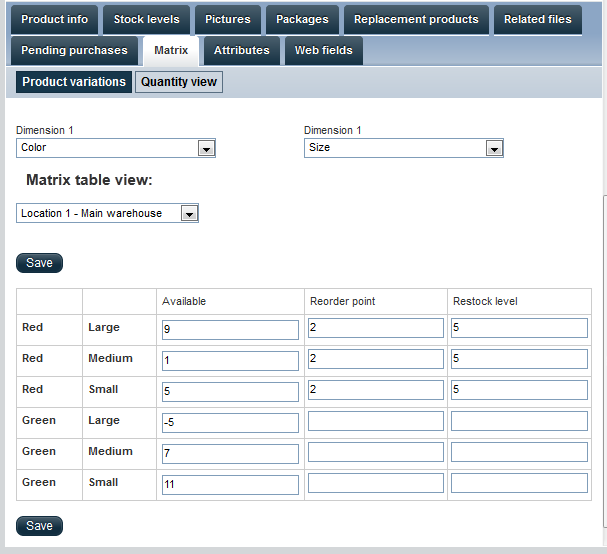
Editing Reorder Point / Restock level for all variations simultaneously
— open a matrix product card, go to “Matrix” → “Quantity View” and select a location. Variation Reorder Points and Restock Levels are now editable.
Editing product cards for all variations.
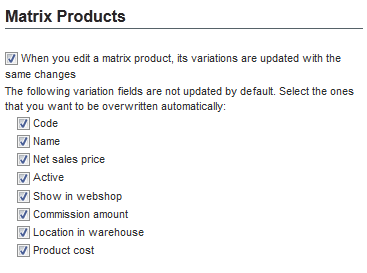
If you edit the product card of a matrix product, the changes can be applied to all variations automatically.
This feature is not enabled by default. Turn it on from
Settings → Configuration → Matrix Products
. Code, name, price etc. are configurable separately. For example, each variation may have a different price that cannot be overwritten. Be sure to select the fields you need!
These variation fields are never overwritten: UPC/EAN, Code 3, Supplier/manufacturer code.
Product list shows matrix total quantity in stock
(sum of variations’ quantities).

Note that using the filter
“Show only items in stock”
(which is available if your account is upgraded to new inventory module) will not list matrix products. The filter will only show specific variations that are in stock.
2.
Integration with Actual Reports lab
el & template designer
(
BETA
)
Erply has been integrated with Actual Reports label & document template designer.
Actual Reports lets you easily design your own custom labels or document
templates
and use these templates for printing from Erply.
Currently, Actual Reports is available for printing product and customer labels.
We are also adding support for purchase orders and assignments; if you need, we can help you create custom templates for these. Printing sales documents via Actual Reports is also in our development roadmap.
Note that
we are eventually planning to phase out the
current product label
module
.
If you have created any custom product labels,
we kindly ask you to
re-build these designs in Actual Reports.
3. Non-Stock Products
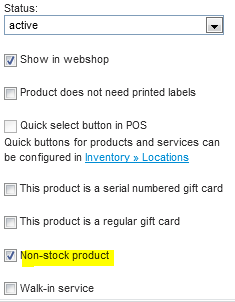
Starting with the new Erply version, a product can be classified as a “non-stock” product. Non-stock products behave similarly to services — they can be sold or purchased, but do not have inventory.
When creating a product card, mark the checkbox “Non-stock product”:
Non stock products are listed alongside with regular products, but Erply does not display the amount on hand:

You can also use the filter “Show only non-stock products”
Instead of adding new services,
we now recommend to use non-stock products instead
.
While we will not disable the Services module for existing customers (nor remove any features associated with it), it will become deprecated in future Erply versions and we don’t plan to enhance it in any way.
A few things that can already be done with non-stock products, but not with services:
- Import from TXT - with Erply’s standard product import
- Add to promotions
- Add to price lists
- Add pictures
If you want to try our new SalonPOS (see below), all salon services have to be defined as non-stock products.
For new customers, the Services module has been turned off.
4. Product assembly
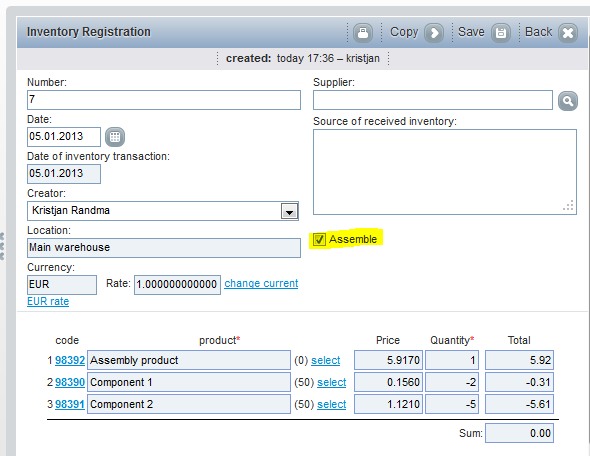
Use Inventory Registration Acts for simple product assembly – to assemble new inventory items out of source components.
A new product type has been added: “Assembly”. An assembly product, just like a bundle, can have a recipe (a listing of source components and their quantities). The difference is that bundles do not physically exist in stock. When a bundle is sold, the components are deducted from inventory at sale time.
Assemblies, on the other hand, are regular inventory items, with a specific quantity on hand. The assembly process deducts components from inventory and adds the finished product(s) back into inventory.
This feature is available if your account has been upgraded to new inventory. For upgrading, contact Erply helpdesk.
To start assembly, select the checkbox “Assemble” on Inventory Registration. Without the checkbox, the assembly product will just be taken into inventory as a regular item.
When the act is confirmed, Erply automatically adds a line for each component, subtracting them from inventory:
5. New Product Statuses and Product Archiving
We have added two new product statuses: “No Longer Ordered” and “Not for Sale”
.
Instead of the checkbox “active” / “inactive”, a product now has 4 possible statuses:
Active.
No Longer Ordered.
This is a new status — for items that are still being sold, but you do not need to order them any more, eg. last season’s collection that is on clearance sale.
Not for Sale
.
This is also a new status — for items that can be ordered, but cannot be sold. Can be used for two purposes: 1) next season’s collection that is being ordered but is not on sale yet, 2) bundle components that are kept in inventory but not sold directly to customers.
Archived.
This is the status formerly known as “inactive”. An archived product cannot be ordered nor sold; and additionally, it is no longer displayed in the Products table, either.
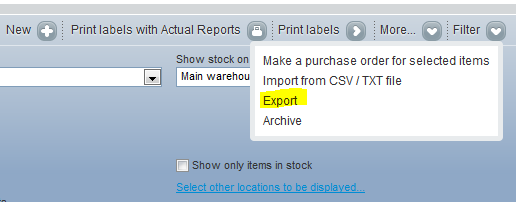
Products in Inventory module can be bulk archived. (Select items with check boxes and click More... → Archive.)
Also, the “X” button now archives a product, not deletes it.
As a consequence, there are no limitations any more to which products can be removed from the list and which ones cannot.
6. Product Export to Excel
You can now easily export all your product data as an Excel file. The same file can be edited, saved as TXT and re-imported to Erply to make bulk changes.
This feature is available if your account has been upgraded to new inventory. For upgrading, contact Erply helpdesk.
- Click the “Export” button to open export dialog.
- Exporting product descriptions and FIFO cost is optional.
- No limits to the amount of exported data.
- Since the print view of products table no longer serves a purpose, it has been deprecated and removed.
- This feature has separate user rights and may not be enabled by default. Go to
Settings → User Groups
to grant access.
7. Drop Shipping
Erply now allows to specify that a PO has to be delivered directly to a specific customer. The “Ship to” field on PO printout will then show customer’s name, address and contact information.
Note that the PO still needs to be received in Erply and an invoice-waybill must be issued to the customer, to account for revenue and movement of goods.
- Select the command “Receive purchase order” to receive PO with a purchase invoice;
- From the purchase invoice, select the command “Create sales invoice”.
8. Delivery date tracking on sales orders and POs
This is an optional feature that you can enable from
Settings → Configuration → Inventory and Purchase - Enable Extra Features
. This module lets users:
- Specify a required delivery date for sales orders (separately for each order row!)
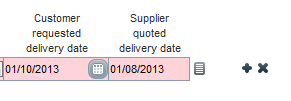
- Specify a delivery date for purchase orders (according to the forecast the supplier provides), for each PO row separately.
- Both Sales orders and Purchase orders can be searched by delivery date.
- On Sales Orders, Erply shows the earliest possible delivery date, according to the information on PO’s. Sales personnel can check these dates to see which customer orders will be affected by a late delivery.
- In
Reports → Purchases
, there is also a Late Deliveries report which lists all unreceived POs with a delivery date earlier than today.
9. Central Purchasing
Erply’s Central Purchasing is built for the use case where all purchasing is done by the HQ, according to customer orders and Reorder Points. HQ creates combined purchase orders across all branch offices. All deliveries arrive to central warehouse and are distributed to branches.
See
Reports → Inventory → Central Purchasing
.
Report
“Create Central Purchase Orders”
creates the purchase orders, grouped by supplier. Go to Purchase module to review, confirm and send the POs.
The other report, “Distribute Goods to Selected Location” creates Inventory Transfers to distribute supplies to branch locations. This needs to be done separately for each branch location.
Central Purchasing is available if your account has been upgraded to new inventory. For upgrading, contact Erply helpdesk.
10. Sales Order Splitting
By default, sales orders reserve the items in stock. However, when a customer’s order gets partially fulfilled, the whole reservation is canceled (there is no longer a reservation for undelivered items)
To overcome this limitation, use order splitting.
Enable it from
Settings → Configuration → “Partial fulfilment splits sales order.”
When enabled, partial fulfilment will split the sales order into two parts - fulfilled part and unfulfilled part. These are listed in Sales Orders as two separate documents. Both parts retain the same order #, with a suffix: “-2”, “-3” etc.
11. LikePOS integration and Salon features
Instead of Erply’s current point of sale interface, you can also try out
Erply’s next generation point of sale —
LikePOS
.
It is still being actively developed, but includes a number of features that Web POS currently does not have, eg. promotion support.
Moreover — LikePOS is also a
full-featured point of sale for salons & spas
.
Together, Erply and LikePOS / SalonPOS will provide everything you need to run your beauty parlor, hairdresser salon, or spa.
Erply’s backend lets you to define services, employee schedules and provides reporting — while SalonPOS has stylist calendar view, Wait List, and POS checkout.
No Erply account yet?
- Sign up for LikePOS
, or - sign up for Salon software
, or - download SalonKeep app from Chrome Web Store
.
Already have an Erply account?
- Enable LikePOS / Salon POS from
Settings → Configuration → POS → Select POS version. - If you need the salon features, please ask Erply helpdesk to activate these.
For setting up your salon in Erply backend, these are the steps you might consider:
- Create the services that your salon provides.
- You need to create your services as
non-stock products in the Inventory module
— see the previous section. - Fill the field “Service time” - this will be the length of appointment. You can also fill “Setup time” and “Cleanup time”, if you want the stylists to have some maintenance time between two appointments.
- If you want customer to be able to select this service in the Walk-in View,, set the check box “Walk-in service”.
- If some of your stylists specialize to specific services only (eg. only haircuts, only coloring), define your product groups accordingly.
- You need to create your services as
- Create employee and user cards for stylists.
- On employee card, set the services that this employee provides. This is important, because otherwise the stylist will not show up in Schedules! Just click the service groups to select, holding the Ctrl key is not needed.
- If you want, set up commission rules.
- If you want customers to be able to select this stylist in the Walk-in View, set checkbox “This stylist servers walk-in customers”.
- Set the “Gender” field for appropriate avatars in Salon POS.
- On employee card, set the services that this employee provides. This is important, because otherwise the stylist will not show up in Schedules! Just click the service groups to select, holding the Ctrl key is not needed.
- Set employee schedules.
- Located in
Settings → Schedules - If you do not see it, enable access rights from
Settings → User Groups. - A schedule is created for one specific location and one specific week. When you create a new schedule, first select location and week; list of employees will then appear. Fill in the working times for each employee and each day.
- Once the schedule is completed, you can copy it to subsequent weeks. Click the “copy” link in the list of schedules and change starting date.
- If your salon has standard shift times, define these on location card (
Inventory → Locations
). Then you can assign an employee to a particular day just by clicking a check box.
- Located in
12. Other major features
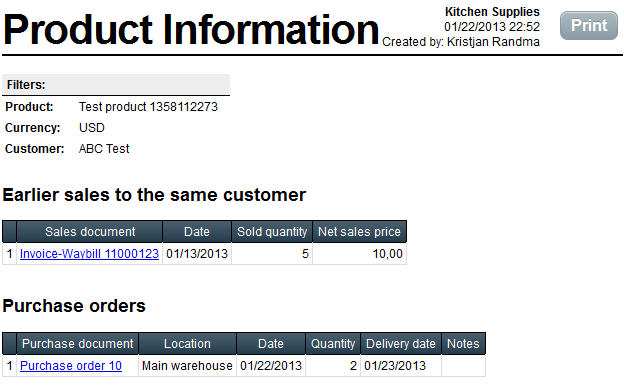
Product Information window

- At the end of each invoice, quote or order row, there is a new button. It opens a report window with two small reports:
- Customer’s previous purchases of the same item (when was it purchased and what was the quantity and price);
- Undelivered POs (so that you would know when it is expected to arrive in stock)
- Customer’s previous purchases of the same item (when was it purchased and what was the quantity and price);
- The same report can also be opened from Inventory module. In that case, it only lists purchase orders.
Store grouping.
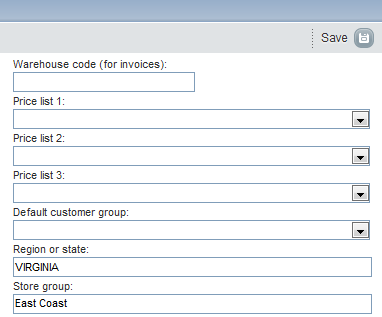
There are two new fields on Location form that can be used for grouping stores:- Region or state;
- Store group.
- Sales reports can be filtered by both region/state or store group. Store groups are also used in Promotions module (a promotion may be applied to a store group) and region/state is used for dashboard widgets. (If you enable the option “Show selected widgets for each location, too”, Erply will display subtotals by region, and you can drill down by clicking on region name.)
- Region or state;

Inventory Transfer Order puts items on hold.
This is an optional feature that you can enable from
Settings → Configuration → Inventory and Purchase
.- Use this setting if you want Inventory Transfer Orders to reserve the listed inventory items (which are intended to be transferred to another location). It serves to ensure that the items will not get sold meanwhile, or used for any other purpose.
- Use this setting if you want Inventory Transfer Orders to reserve the listed inventory items (which are intended to be transferred to another location). It serves to ensure that the items will not get sold meanwhile, or used for any other purpose.
Inventory Transfer Order removes items from inventory.
This is an optional feature that you can enable from
Settings → Configuration → Inventory and Purchase
.- This setting can be used if shipping from one location to another takes time and meanwhile the goods should not be accounted in either warehouse .
- The following procedure must be followed:
- When shipping out the goods from source warehouse, create a Transfer Order;
- When goods arrive to destination, turn it into an Inventory Transfer.
- When shipping out the goods from source warehouse, create a Transfer Order;
- This setting is not compatible with the previous one, “Inventory Transfer Order puts items on hold”
- This feature is only available if your account has been upgraded to new inventory module. For upgrading, contct Erply helpdesk.
- This setting can be used if shipping from one location to another takes time and meanwhile the goods should not be accounted in either warehouse .
Purchase Waybills.
This is an optional feature that you can enable from
Settings → Configuration → Inventory and Purchase
.- Currently, receiving a PO is done by creating a Purchase Invoice. A purchase invoice takes items into stock as well as generates an obligation to pay to the supplier.
- But if your suppliers send supplies continuously as needed, but only bill once a month, and you want this distinction to be reflected in Erply, too, enable the setting for more fine-grained control.
- It uncovers two new purchase document types: a
Purchase Waybill
and a
Purchase Invoice
. The existing document type gets renamed to
Purchase Invoice-Waybill
. - These document types work the same way as in Sales module — a Purchase Waybill takes items into stock, but does not affect your Accounts Payable. If the supplier finally bills for the shipments, select the Waybills and turn them into a Purchase Invoice. This is the document that gets listed in your Accounts Payable.
- Currently, receiving a PO is done by creating a Purchase Invoice. A purchase invoice takes items into stock as well as generates an obligation to pay to the supplier.
Account Movement Report (beta).
This report is located in Reports → CRM.- It tracks the number of “active” (who have recently purchased something) and “inactive” customers, and how much percentual movement there has been between the two categories.
- It tracks the number of “active” (who have recently purchased something) and “inactive” customers, and how much percentual movement there has been between the two categories.
Invoices → Sales Orders → “Orders to be fulfilled”.
This report lists all sales orders for which there is sufficient stock in warehouse and that can thus be delivered.- It is intended as a printout for the warehouse personnel.
- For packaged orders, you still need to create invoices later.
- To enable this feature, contact Erply helpdesk.
- It is intended as a printout for the warehouse personnel.
Minor Updates
Inventory
- Product import supports importing Manufacturer (Supplier) Code.
- New setting — product cannot be sold if the amount in stock has been reserved to another customer.
- If that is the case, Erply will prevent you from confirming the sales invoice.
- See Settings → Configuration → Inventory and Purchase
- If that is the case, Erply will prevent you from confirming the sales invoice.

- Automatic generation of product codes and EAN’s (UPC’s) now works exactly the same.
- On a new product card, both fields initially show the keyword “automatic”. Code/UPC appears when the product card is saved.
- On a new product card, both fields initially show the keyword “automatic”. Code/UPC appears when the product card is saved.
- In Settings > Configuration, it is now possible to designate a “Main warehouse”.
- Main warehouse stock quantities are displayed in Stock Replenishment Report,
for comparison (if you’d like to order new supplies from the central location)
- Main warehouse stock quantities are displayed in Stock Replenishment Report,
- Product history report shows PO numbers next to each purchase invoice.

- Previous / Next buttons to move between product cards.
- Product group pictures are now enabled on all accounts.
- Field “Location in warehouse” on product card is enabled for all accounts.
- Stock Replenishment Report has new filter option:
- “Show only products with stock on hand exceeding Restock Level”
- “Show only products with stock on hand exceeding Restock Level”
Customers
- Australian customers now have the “State” field for addresses.
- “Last Payment” widget has been added to customer card.
- Tabs on customer card have been reordered. Invoices, Payments, Quotes and Orders are now listed first.
- All German accounts now have the “Tax exempt” field on customer card.
Sales
- When turning waybills into a Sales Invoice, the waybills no longer need to be all from same location.
- On a Credit Invoice form there is now a field which specifies whether the transaction was a Void or a Return (only for transactions made from Offline POS)
- Customer’s Tax Exemption Number that was entered in POS can now be seen on invoice form. (only in US and only for sales made in Offline POS)
- Adjusted invoice printout: if payer and receiver of goods are the same, then it is titled simply "Client", not "Payer"
- When reprinting a POS credit invoice (ie. a return or void) from Invoices module, it is now formatted as a POS receipt, not as an invoice.
- We have adjusted tax settings for Canada. Similarly to the US, item prices are now displayed without tax (without HST / GST). Tax is added at the end of receipt.
- Sales reports no longer depend on the configuration setting which was titled
“Compose sales reports by warehouse turnover / by sales documents”
. Erply actually has separate reports for sales revenue and for COGS.- We have adjusted the wording to make it clear the setting only applies to dashboard widgets and graphs:
- We have adjusted the wording to make it clear the setting only applies to dashboard widgets and graphs:

- The registry of sold gift cards can now be fully edited. See
Inventory → Gift Cards
. - Importing price list prices (with product import) is no longer limited to active price lists. You can also import data to inactive and future price lists.
- Zero tax rates on invoice printout: Erply now displays the tax by name, not just “0%”. In some jurisdictions, tax free and 0% tax must be reported separately.
- Invoice # can be printed on the invoice as a bar code.
- Enable this from
Settings → Configuration → Sales document printouts → “Print document # as a barcode on sales documents”
- Enable this from
- EE customers: Payment import from Sampo bank
- EE customers, export to Hansa Accounting: two setting fields have been added (cash account # and card payments account #)
- Regional settings have been applied to LT and LV: Customer registration number and VAT number are always printed on sales invoices.
- Invoices, Sales Orders and Quotes tables now contain a “Location” column.
- Sales Order form no longer has the fields “Payment Deadline” and “Payment status”, because those fields are not applicable to orders. If the order has been followed by a sales invoice, payments are usually associated with the invoice and you should refer to invoice when checking payment status or payment deadlines.
Sales Reports
- There are 5 new views in the Sales Report module:
- Sales By Weekdays
- Sales By Hours
- Sales By Location
- Sales By Register
- Sales By Business Area (grouped by customer business area)
- Sales By Weekdays
- Sales reports also have a number of new comparison options:
- Compare locations - units sold
- Compare locations - units sold + net sales
- Compare salespeople - units sold + net sales
- Compare locations - sales + current stock (in retail prices)
- Compare locations - sales + current stock (in cost)
- Compare locations - units sold
Purchase
- For clarity, we have renamed the command “Create Purchase Invoice” to
“Receive Purchase Order”
. - Until now, Erply always considered a PO to be fulfilled when it had been received with a Purchase Invoice — regardless of whether the PI contained all the ordered items and quantities or not.
We have added a more fine-grained option where Erply compares PO and purchase invoice items and quantities, and shows unreceived quantities as “ordered and arriving soon”. If this is indeed the case (your suppliers usually send POs in multiple batches), enable this option fromSettings → Configuration → Inventory and Purchase → “Purchase order is considered fulfilled when:”
Note that if a PO is not going to be fully delivered, you need to change it manually to “received” status, so that it would no longer show up as “arriving soon”.
For new customers, this option is enabled by default. - Purchase order form is now more similar to purchase invoices - line totals and order total has been added.
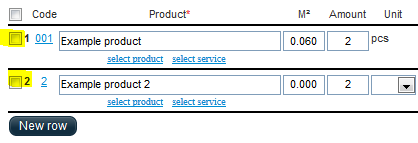
It is also possible to add Additional Costs (eg. to estimate how will shipping affect the cost). - When receiving a purchase order (creating a purchase invoice), it is now easier to do a partial receive. Pick specific lines that were received:
- Purchase orders have a field “Order Tracking number”
- New report “All purchase orders in selected period”
- See Reports → Purchases
- The report lists all PO lines that have not been received yet.
- See Reports → Purchases
“Clear undelivered items from PO”
— if supplier did not send all ordered items (and will not send a later shipment), and missing items are going to be re-ordered with a new PO, you may use this feature to delete undelivered items and quantities from the original PO.- As a result, PO and purchase invoice will have the same lines and quantities.
- Find the PO or PI and click
More...> List of undelivered items
. Button “Clear undelivered items” is located there.
Note that alternatively, you may just set the PO to “received” status
.
It achieves the same result — Erply’s inventory replenishment will consider that order to be completed and fulfilled.
- As a result, PO and purchase invoice will have the same lines and quantities.
- Easily adjust the VAT / tax rate for all purchase document rows, or set a uniform discount to all lines.

- We have clarified the procedure how Erply fetches an item’s default wholesale (purchase) price. If you add an item to a purchase order, Erply loads the price (in the following priority):
- From supplier’s price list. If quantity discounts are enabled, then according to quantity.
- From the most recent purchase invoice where this item was received (without regarding supplier or location)
- From the “Cost” field on product card
- From the last Inventory Registration. This is useful if you have done an initial import of inventory costs and quantities, but there are no other transactions with that product yet.
- From supplier’s price list. If quantity discounts are enabled, then according to quantity.
- Subsection “E-mail log” has been added to Purchase Order card – showing when the PO has been sent by e-mail and who sent it. (Sales documents already have a similar log.)
Reward Points
- A coupon can be set up to deduct a certain number of reward points (“printing cost”) when printed. Also, a coupon can now be configured to be printed automatically if customer has a specified number of reward points or more.
- Note that the coupon is printed not only when customer reaches the specified number of points — but on each subsequent purchase, too. Therefore the two features should be used in conjunction: printing the coupon should subtract a number of points.
- Only for customers with the Promotions module and Reward Points module installed.
- Note that the coupon is printed not only when customer reaches the specified number of points — but on each subsequent purchase, too. Therefore the two features should be used in conjunction: printing the coupon should subtract a number of points.
- By default reward points will not expire any more, if you leave the respective setting field empty.
- If you have set reward points to not expire, reward points for customer can be manually edited on customer card.

- In US and Canada, reward points are now calculated from invoice net total. In the rest of the world, reward points are derived from invoice total with VAT.
- It is possible to specify (on product card) that the sale of this item does not give the customer any reward points.

Payment Reminders and Balance Statements
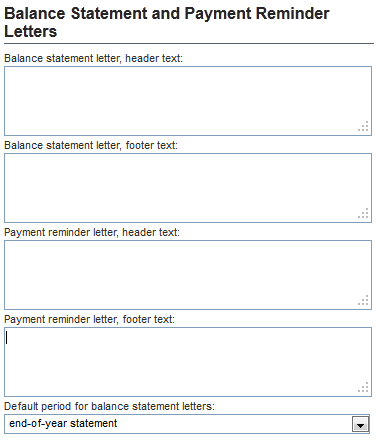
- The text displayed on Payment Reminders and Balance Statements is now configurable. These texts can be edited in Settings → Configuration → Balance Statement and Payment Reminder Letters.
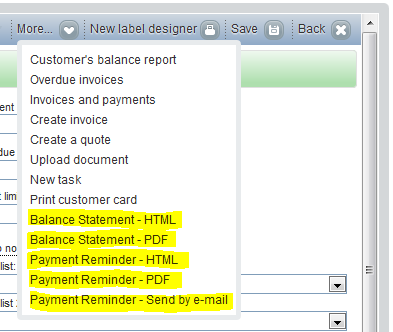
- We have updated the printouts of both letters, and both letters can now be printed either as HTML or PDF.
- Both letters can be printed from customer card.
- A Payment Reminder Letter lists all unpaid invoices — while a Balance Statement Letter only shows transactions from a certain time period. If you want to fetch the letters directly from customer card, you need to pre-define statement period. From Settings → Configuration, you can select if the statement should by default be an end-of month or end-of-year statement.
- The whole history, of course, is still available from customer’s balance report.
- We have updated the printouts of both letters, and both letters can now be printed either as HTML or PDF.
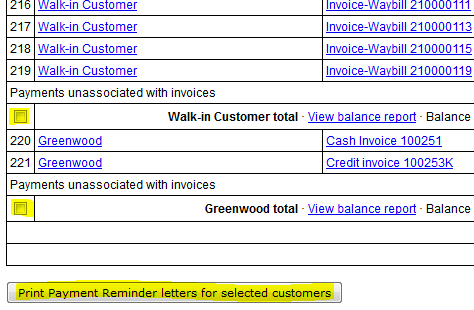
- Payment Reminder Letters can be printed in bulk, from Reports → Sales → Unpaid invoices and balance statements. Select customers with checkboxes and click the button at the end of the report.
- In Balance Statement report, unpaid invoices are now colored red.
- Payment Reminders
can be configured to either list
all unpaid invoices
, or only those that are overdue. This setting is located in
Settings → Configuration → Invoices and sales. - Balance Statements
(the printouts for customers) can be configured
not to show paid invoices
and corresponding payments.- This will make balance statement shorter by omitting lines that cancel out each another.
- This setting is located in
Settings → Configuration → Invoices and sales.
- This will make balance statement shorter by omitting lines that cancel out each another.
QuickBooks
- Quickbooks export now has default Sales and COGS accounts — you don’t need to manually define one for each product group. See
Reports → Export to accounting
.
QuickBooks Web Connector
has been deprecated. For QuickBooks users we now recommend downloading IIF journal files from Erply and importing them into QB.
Locations
- We are adding experimental support for multi-timezone setups. It is now possible to set a different time zone for each location (in Inventory → Locations).
- Currently, this information is only used for some appropriate adjustments in Z Report. Other features or adjustments may follow in the future.
- Currently, this information is only used for some appropriate adjustments in Z Report. Other features or adjustments may follow in the future.
Assignments
- Small changes in Assignments module:
- New search filters added for Assignments and Appliances
- New columns added to the list of Assignments.
- Assignments now also have a location field (for multi-location workshops)
- Assignments can be searched via general search
- “Assignments” tab has been added to customer card
- New search filters added for Assignments and Appliances
Physical stocktaking
- On a stocktaking act, header “freezes” if you scroll down (will always be visible)
- Physical stocktakings have a new view option “Shortened stocktaking act”. It lists only items that have a non-zero stock quantity, or which you have already provided a count for.
- Can be useful for reviewing a stocktaking that was done with mobile devices.
- Can be useful for reviewing a stocktaking that was done with mobile devices.
- Stocktaking act is now orderable by “Location in Warehouse”
Reason Codes
- Module Settings → “Reasons for writing off inventory” has been renamed to Reason Codes. Reason codes can be used for multiple purposes (discount reasons, return reasons, write-off reasons)
- When creating a new reason, select what purpose it is intended for.
- Discount reasons are only supported by Touch POS (POS asks for a reason when making manual discount)
- Return reasons are currently only supported by Offline POS (POS asks for a reason when customer returns an item)
- When creating a new reason, select what purpose it is intended for.
Coming soon — features we are working on:
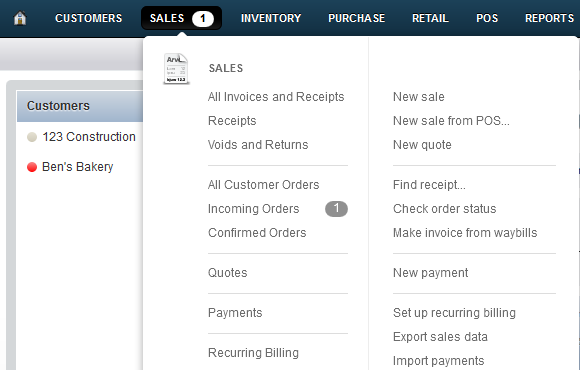
A redesigned main menu:

Reporting API
— All Erply reports available real-time via API
Account names
— pick a name for your Erply account and use it for logging in. Remembering your “Customer Code” will no longer be needed.